Thursday 30 October 2014

Flight: Making Meerkat


I started modelling my Meerkat Character quite a while ago, but hadn't posted any progress since then.  So this post will show the steps I went through to create this character.

I started out by drawing some orthographics to aid me with modelling.  I wanted my character to be semi-realistic but still relatable, so I used a lot of reference photos of meerkat's to try and get the proportions right.   Then I exaggerated the size of the head and eyes and shortened the snout.


Once I began modelling I actually started again a couple of times.  This is part of my usual workflow, as I find it useful to model roughly while not worrying about deformation and topography to help me visualize the character in 3D.


I got the shape of the body locked down first (as seen in my earlier post) before concentrating on the head. This was my first time modelling an animal character so I had to do a bit of thinking to figure out how to translate what I knew about modelling human heads into an animal form. 


I started off with a rough to look at the shape of the head, before moving on to model it better.  for the Meerkat's ears I started off modelling them more realistically- before deciding that a simpler ear suited the design better.  


After some more tweaking and finalizing the model it needed to be UV unwrapped for texturing.  It took a while but eventually I had a really nice unwrap. 


I started work on creating the Meerkat's expressions using blendshapes.  This is always pretty cool as you can final see the character coming to life.  The small army of Meerkat heads below all show slight expression variations, which can be mix and matched.


When it came to texturing my Meerkat I had looked into using Maya Fur with a colour map as an option.  However early experiments showed that this really wasn't the look I wanted, and was a step away from my initial character designs.  Because of this I didn't do any tests of well groomed fur but did do a quick test by plugging a colour map painted in Mudbox into the fur color node.
In the end I used a texture and normal map which I hand-painted using Mudbox.


Finally the Meerkat's eyes were textured in Photoshop.


While this was going on I was also rigging my character.  This ended up being a bit of a issue for me this time round.  Initally I came across an awesome plugin for Maya which I had thought to use, called Quadruped Rigger.  This is an automated rigger for four legged animals so i thought it would be a brilliant time saver.   However when I tested the Rigger I saw that it had an extra leg joint in the front legs and was better suited to rigging horses or deer.  I didn't know enough about how this rig was put together to alter it easily so I decided it would be faster to build my own simpler rig instead.

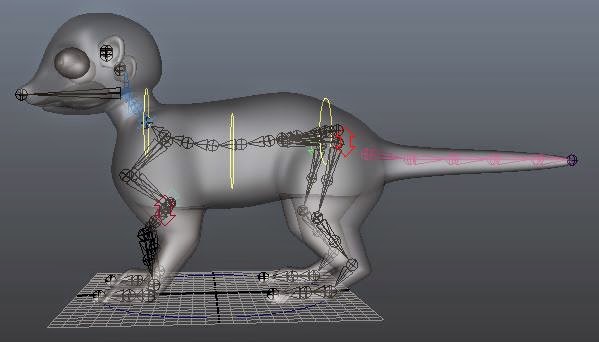
The extra joint in the front leg made using this rig impossible, as the joint would pop out the wrong way.  Shifting the joints into different placement within the leg would also not work because of the automated rigging process


This went well at first, and I was surprised by how fast it came together.  However I either made a mistake in the order somewhere, something went wrong with my actual skeleton or something corrupted.  Honestly I still have no idea what the problem was- but it wasn't something I could figure out how to fix, even after looking at many resources.  

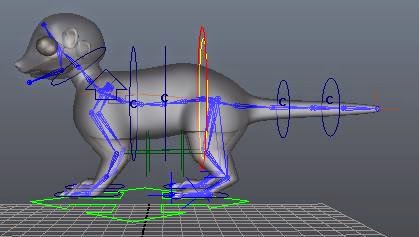
My Rig.  The legs, back, shoulders and tail were all set up and working perfectly, but I couldn't connect the hip controllers.

Since I couldn't figure this out at all I decided to start again, using the Quadruped Rigger as a base.  I didn't understand how some of this rig was set up, especially as it had stretch, and I have zero scripting knowledge so I knew I couldn't match anything to it completely.  However I could use the rig as usual, then delete the front legs and replace them after the rig was built.  This worked great, but unfortunately the controllers made by the auto rigger could not be frozen and zeroed off.  I found that this was something that could be change in the script before the rig was built, so I start over one last time, also adding in a jawbone and eye controlers.


After painting skin weights Meerkat was finally finished!


Meerkat: Fur

Although I decided not to use it in the end I did quite a bit of research into Maya fur and the use of maps to change fur colour and baldness.

These are some of the resources I looked at:

The Maya User guide has a pretty detailed section on applying fur to animals or eyelashes.  This was a really good starting point as it talks about how to get the fur going in the right direction and touches on painting attributes.  The rest of the guide has a lot of other useful information too about working with fur, including this section on mapping fur attributes.

I also looked into dynamic Fur as this was something I thought I might like to explore.
The guide here is really old, but explains things step by step

I also found some video tutorials which looked useful:


However I decided that fur wasn't the direction I wanted to go with this, and that hand painted textures would better reflect my initial character design.


edit: Seems the rest of the embedded tutorials fell off this post :/ 

Thursday 9 October 2014

Realflow Water Simulation

I realised I hadn't posted this up yet!  What a slacker.

Anyway this is my finished waterfall for the water simulation assignment.  Unfortunately the whole simulation didn't render on time, and it doesn't look like I'll have the chance to let it finish anytime soon.


This simulation used the Hybrido system in Realflow as I felt it gave the nicest flow.  Unfortunately it also gave incredibly slow simulations so I ran out of time to do some more tweaking to get the water speed looking more realistic.  At this point it kind of drips over the edge of the waterfall.  Probably due to the length of time taken to actually see results I didn't enjoy this assignment as much as some of the previous ones- although I think if I had started my final waterfall earlier and done a bit more research this would have helped.

Tuesday 7 October 2014

Environment: Trees

The desert in Flight is filled with grasses and camel thorn trees.  While I should be able to use the grasses in Vue and simply recolour them, the Camel Thorn Tree is a bit trickier.  Vue has an Acacia tree which looks similar.  This gives me the option of using this tree to populate my desert, or altering it slightly.  This will be a simple option for trees further away, and will allow some subtle movement of these trees as they can interact with the wind effects in Vue.

Figure 1: Desert and tree experimentation using Vue.


However my characters also need to interact with a tree close to the camera.  The trees branches and leaves will need to shake as my character climbs it.  I've been doing some research into how I could rig this tree and come across a few ideas.

If I model the tree in Maya I should then be able to attach a rig to the tree.  I had thought about using the skeleton system for the branches.  To get the leaves to move I might need to consider using a simulation- this is something I will need to test ASAP.

Here are some examples and tutorials I found for both modelling and rigging trees during my research:


Designing and Animating a Tree using Paint Effects - This tutorial shows how to alter a paint effects tree for your own purposes


Modelling and Rigging a Palm Tree  - In this tutorial a palm tree is modelling using nurb circles and then rigging with joints.


I have also now found out that I can rig the tree by using a curve and attaching clusters and controllers to the control points, rather then needing to build a skeleton; or even animate the tree simply using a lattice deformer.

Bones of Essimer VFX: Nuke, Keying and Camera Tracking

Everyone has been getting stuck in on our Bones of Essimer Thursday's and I am beginning to feel like we are actually starting to move forward.  The Mastersheet is finished, VFX data typed up and I have the Tiff sequences for the Sizzle Reel. 

So on Thursday I spent the day getting the Tif sequences in order and starting on some greenscreen keying.

The sizzle reel is only a minute long with 21 shots- so is a much less daunting task then the full cinematic.  I managed to get all of the greenscreen shots keyed today- although a couple still need a little attention to fix up some spill issues.


One of the positives of the footage is how easily a key can be pulled from the greenscreen.  Unfortunately a couple of shots look like they have a touch of crawl- I realised this was actually due to the grainy footage- rather than a keying issue.  Hopefully some atmospherics and grading will help to hide this a little.


I'm still waiting on the files for the grade, and we are also still working on huts, but hopefully we can have these done soon and start compositing.

Bex has been working on the Bone Ship shot so I also did a bit of camera tracking.  I couldn't remember how to export the camera, but found a tutorial that helped.  I was a bit out of practise so made a few mistakes, and we had trouble with the different scale between Nuke and Maya; so we went over this is class.  Since I now know a bit more what I am doing I'll probably start working through the camera tracking on the other shots this week.