Thursday, 13 November 2014

Flight: Making Eagle


 The final model for Eagle- posed

And from above

As with Meerkat I started off by gathering plenty of reference imagery, as seen earlier in the blog.  I then drew up some othographics.


 Modeling WIP:

Starting out I created the rough shape of the eagles head and body.

Created details such as the beak and legs separately before combining 
I then refined the shape until I was happy with it.
I created the basic shapes for the base of the wing, which I planned to later apply the feathers to as planes.


Partway through my modelling process I came across the tutorial below- which was rally great for seeing how someone else would approach modelling a bird


Added Blendshapes for expressions
Exploring transparency

I hand painted feathers in photoshop and applied the textures to planes.  I ended up having to do quite a bit of research into feathers and transparency mapping.  In the above image I experimented with threading in a separate transparency map (which didn't work in mental ray- I found out why later), or save my textures as tiffs with alpha channels  (right feather)


Originally I had thought to use a feather system to texture my eagle, and looked into a few options, such as the Dodo Master (only works on nurbs), This feather system script, and adapting a maya hair system.   Like with Meerkat though I decided against this in the end and began my texturing using Mudbox.    I actually textured the eagle before the Meerkat, so didn't quite have the technique down at this point.  

First texture option for Eagle

I ended up not being completely satisfied with my first texturing attempt, and I had difficult with the colours in Mudbox sometimes not appearing as I thought they should.   In the end I decided to re-texture from scratch in Photoshop, as i wanted more flexibility with my brushes. 

Photoshop Eagle texture
I used the feathers that I had created earlier and added these throughout the texture.  For my bump map I took elements from the normal map I had made in Mudbox and combined them into the textures bump map.

Bump Map
Spec

Feathers and Wing attempt
I brought all my feathers into Maya and began placing them to create the wing.  However I quickly realized that this was going to be a long, painful job.  I also noticed that I had issues with my feathers when the transparent planes intersected- and because I had not spent much time shaping them these could potentially happen quite often once i started animating.  I decided to give Wing Creator a try.  This brilliant script sets out your feathers and rigs the wings automatically, complete with blend shapes for feather movement.  I mapped my own feather textures onto the system and ended up with the wings below.   

Wings made using Wing Creator
I had to match these wings to my model by scaling the rig and moving the controllers. 

Completed rig


The rest of the rig was pretty simple, with set driven keys to control the eagles claws.


Thursday, 30 October 2014

Flight: Making Meerkat


I started modelling my Meerkat Character quite a while ago, but hadn't posted any progress since then.  So this post will show the steps I went through to create this character.

I started out by drawing some orthographics to aid me with modelling.  I wanted my character to be semi-realistic but still relatable, so I used a lot of reference photos of meerkat's to try and get the proportions right.   Then I exaggerated the size of the head and eyes and shortened the snout.


Once I began modelling I actually started again a couple of times.  This is part of my usual workflow, as I find it useful to model roughly while not worrying about deformation and topography to help me visualize the character in 3D.


I got the shape of the body locked down first (as seen in my earlier post) before concentrating on the head. This was my first time modelling an animal character so I had to do a bit of thinking to figure out how to translate what I knew about modelling human heads into an animal form. 


I started off with a rough to look at the shape of the head, before moving on to model it better.  for the Meerkat's ears I started off modelling them more realistically- before deciding that a simpler ear suited the design better.  


After some more tweaking and finalizing the model it needed to be UV unwrapped for texturing.  It took a while but eventually I had a really nice unwrap. 


I started work on creating the Meerkat's expressions using blendshapes.  This is always pretty cool as you can final see the character coming to life.  The small army of Meerkat heads below all show slight expression variations, which can be mix and matched.


When it came to texturing my Meerkat I had looked into using Maya Fur with a colour map as an option.  However early experiments showed that this really wasn't the look I wanted, and was a step away from my initial character designs.  Because of this I didn't do any tests of well groomed fur but did do a quick test by plugging a colour map painted in Mudbox into the fur color node.
In the end I used a texture and normal map which I hand-painted using Mudbox.


Finally the Meerkat's eyes were textured in Photoshop.


While this was going on I was also rigging my character.  This ended up being a bit of a issue for me this time round.  Initally I came across an awesome plugin for Maya which I had thought to use, called Quadruped Rigger.  This is an automated rigger for four legged animals so i thought it would be a brilliant time saver.   However when I tested the Rigger I saw that it had an extra leg joint in the front legs and was better suited to rigging horses or deer.  I didn't know enough about how this rig was put together to alter it easily so I decided it would be faster to build my own simpler rig instead.
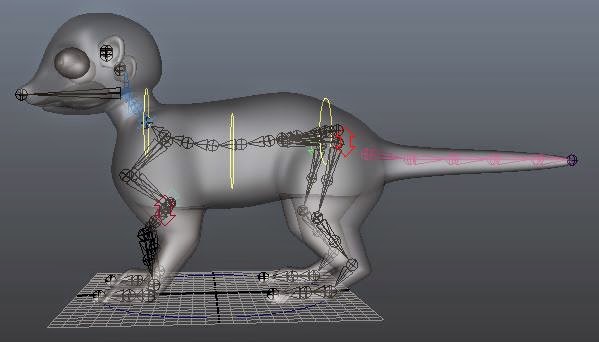
The extra joint in the front leg made using this rig impossible, as the joint would pop out the wrong way.  Shifting the joints into different placement within the leg would also not work because of the automated rigging process


This went well at first, and I was surprised by how fast it came together.  However I either made a mistake in the order somewhere, something went wrong with my actual skeleton or something corrupted.  Honestly I still have no idea what the problem was- but it wasn't something I could figure out how to fix, even after looking at many resources.  
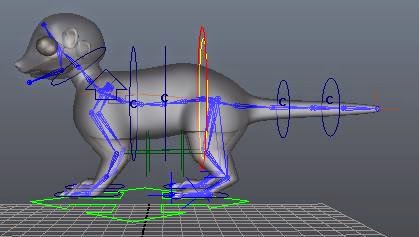
My Rig.  The legs, back, shoulders and tail were all set up and working perfectly, but I couldn't connect the hip controllers.

Since I couldn't figure this out at all I decided to start again, using the Quadruped Rigger as a base.  I didn't understand how some of this rig was set up, especially as it had stretch, and I have zero scripting knowledge so I knew I couldn't match anything to it completely.  However I could use the rig as usual, then delete the front legs and replace them after the rig was built.  This worked great, but unfortunately the controllers made by the auto rigger could not be frozen and zeroed off.  I found that this was something that could be change in the script before the rig was built, so I start over one last time, also adding in a jawbone and eye controlers.


After painting skin weights Meerkat was finally finished!


Meerkat: Fur

Although I decided not to use it in the end I did quite a bit of research into Maya fur and the use of maps to change fur colour and baldness.

These are some of the resources I looked at:

The Maya User guide has a pretty detailed section on applying fur to animals or eyelashes.  This was a really good starting point as it talks about how to get the fur going in the right direction and touches on painting attributes.  The rest of the guide has a lot of other useful information too about working with fur, including this section on mapping fur attributes.

I also looked into dynamic Fur as this was something I thought I might like to explore.
The guide here is really old, but explains things step by step

I also found some video tutorials which looked useful:


However I decided that fur wasn't the direction I wanted to go with this, and that hand painted textures would better reflect my initial character design.


edit: Seems the rest of the embedded tutorials fell off this post :/ 

Thursday, 9 October 2014

Realflow Water Simulation

I realised I hadn't posted this up yet!  What a slacker.

Anyway this is my finished waterfall for the water simulation assignment.  Unfortunately the whole simulation didn't render on time, and it doesn't look like I'll have the chance to let it finish anytime soon.


This simulation used the Hybrido system in Realflow as I felt it gave the nicest flow.  Unfortunately it also gave incredibly slow simulations so I ran out of time to do some more tweaking to get the water speed looking more realistic.  At this point it kind of drips over the edge of the waterfall.  Probably due to the length of time taken to actually see results I didn't enjoy this assignment as much as some of the previous ones- although I think if I had started my final waterfall earlier and done a bit more research this would have helped.

Tuesday, 7 October 2014

Environment: Trees

The desert in Flight is filled with grasses and camel thorn trees.  While I should be able to use the grasses in Vue and simply recolour them, the Camel Thorn Tree is a bit trickier.  Vue has an Acacia tree which looks similar.  This gives me the option of using this tree to populate my desert, or altering it slightly.  This will be a simple option for trees further away, and will allow some subtle movement of these trees as they can interact with the wind effects in Vue.

Figure 1: Desert and tree experimentation using Vue.


However my characters also need to interact with a tree close to the camera.  The trees branches and leaves will need to shake as my character climbs it.  I've been doing some research into how I could rig this tree and come across a few ideas.

If I model the tree in Maya I should then be able to attach a rig to the tree.  I had thought about using the skeleton system for the branches.  To get the leaves to move I might need to consider using a simulation- this is something I will need to test ASAP.

Here are some examples and tutorials I found for both modelling and rigging trees during my research:


Designing and Animating a Tree using Paint Effects - This tutorial shows how to alter a paint effects tree for your own purposes


Modelling and Rigging a Palm Tree  - In this tutorial a palm tree is modelling using nurb circles and then rigging with joints.


I have also now found out that I can rig the tree by using a curve and attaching clusters and controllers to the control points, rather then needing to build a skeleton; or even animate the tree simply using a lattice deformer.

Bones of Essimer VFX: Nuke, Keying and Camera Tracking

Everyone has been getting stuck in on our Bones of Essimer Thursday's and I am beginning to feel like we are actually starting to move forward.  The Mastersheet is finished, VFX data typed up and I have the Tiff sequences for the Sizzle Reel. 

So on Thursday I spent the day getting the Tif sequences in order and starting on some greenscreen keying.

The sizzle reel is only a minute long with 21 shots- so is a much less daunting task then the full cinematic.  I managed to get all of the greenscreen shots keyed today- although a couple still need a little attention to fix up some spill issues.


One of the positives of the footage is how easily a key can be pulled from the greenscreen.  Unfortunately a couple of shots look like they have a touch of crawl- I realised this was actually due to the grainy footage- rather than a keying issue.  Hopefully some atmospherics and grading will help to hide this a little.


I'm still waiting on the files for the grade, and we are also still working on huts, but hopefully we can have these done soon and start compositing.

Bex has been working on the Bone Ship shot so I also did a bit of camera tracking.  I couldn't remember how to export the camera, but found a tutorial that helped.  I was a bit out of practise so made a few mistakes, and we had trouble with the different scale between Nuke and Maya; so we went over this is class.  Since I now know a bit more what I am doing I'll probably start working through the camera tracking on the other shots this week.  


Monday, 15 September 2014

Pen Drawings: Meerkat

These are some really quick character roughs, exploring different expressions. 

Flight: Meerkat Movement and Expressions

So a while back I created a post centred around birds in flight with heaps of links to potential reference videos.  Today I am doing the same, but this time looking at the movement of my other character, Meerkat.

These clips have some really nice Meerkat moments:


Another consideration in my animation will be creating expressive characters while still maintaining the animal quality- especially as my designs aren't especially stylised in terms of the shapes and appearances of the characters.  Because the forms of the characters are quite true to real life I need to find a good balance between this and the characters expressions.

Disney has approached this issue many times with the large cast of animals in their films, and often solves it by stylizing the characters.  Some good reference I have been looking at are the expression sheets from films like Bambi which has a level of realism in the characters but still makes this work.

Figure 1: Bambi Expressions. 1939. Walt Disney Productions.  Retrieved from http://andreasdeja.blogspot.co.nz/2013/03/marc-davis-talkes-about-bambi.html

In this clip, Marc Davis talks about how they manged to create Bambi's expressions by looking at human children, and translating these onto Bambi.  This can be seen in the stylization of Bambi- the shorter snout and bigger forehead mimic that of a baby, whereas a fawn does not have these features.  Strangely enough this is also something I applied to my young Meerkat design without even thinking about it. 


Since I am animating a Meerkat, I obviously can't not look at Timon's expressions from The Lion King.  Timon is a very stylised Meerkat, and constantly walks on two legs.  While my Meerkat isn't as stylised as this it is useful to look at how his expressions were achieved. 

Figure 2: Timon Model Sheet. 1993. The Walt Disney company.  Retrieved from http://blogs.disney.com/insider/2014/06/19/throwback-thursday-modeling-the-lion-king/#banzai


Sunday, 14 September 2014

One of those weeks

What follows is a rant.

So I have had a decidedly unconstructive week.  I started off the week well, working on my water simulation which was due soon.  I was reasonably happy with how it was looking.  But then the issues began.

First up I had a computer crash almost every night while simulating.  This meant that I lost simulation data and had to begin again.  Once I began to get closer to a decent amount of frames simulated the computer ran out of ram.

Meshing took longer than I thought it would, around 26hours before the computer crashed.  At this point I had had a headache for around 24hours which was developing into a migraine.  I decided that enough was enough.  I would just have to use what I had.  I still needed to mesh my foam and splashes so I set this going and headed home to rest.

So unfortunately my water simulation is one of those projects that I feel quite disappointed about.  Initially I really enjoyed working with realflow, but not allowing enough time to get everything right really soured the experience.

Between Realflow and headaches I didn't manage to hardly look at anything else this week!  How time flies when you are having frustrations.  Ok, rant over now.

On a more positive note I have the next version of the edit, and have heard that the sizzle reel is ready too!  I've started going through the new edit and am trying to make this a priority to get done so everyone can get started working on this, but I still need to match up some of the data to the shots.  This is going to take a bit longer than it should due to me confusing myself on set (I was working off the format used in the storyboards (S1S1) and matching each shot to the appropriate storyboard, the clapper was working from order of shooting (S1SA, S1SB), and the camera assist who wrote down some of the camera data for me the first day wrote in order of shooting (S1S1, S1S2).  

I could have saved myself some hassle if I had known beforehand that not all shots were going to be shot as per storyboards, and could have applied an ID system instead of focusing on shots.  I also didn't really realise how much change was going to happen in the editing phase, so S1S1 of the storyboards was no longer S1S1 of the film.  Hindsight is a wonderful thing- I now have a better idea of how I would approach data collection on a shoot like this one, and about some discussions that should have been had beforehand.

Sunday, 7 September 2014

Flight: Modelling Meerkat

I've started working on modelling the Meerkat character.  At the moment it is still at the low geometry stage, while I try to work out the topology of the model.


I was concerned about the legs at this point, as I didn't think they would deform properly.  I took out some edge loops so I could manipulate the shape easier.  Then I extracted the back leg and extruded the edges, before reattaching.  I'm hoping this will allow move movement and better deformation.

Thursday, 4 September 2014

Flight: Storyboarding and Thumbnails

Over the past few weeks I have been working on getting my post production work done for Flight- notably thumb-nailing out my shots.

This has been a really good process for me, as somewhere along the line during this process the story began to shift in ways I hadn't intended.  I'm still working on putting the story onto it's final path and deciding exactly what elements to use.  Thumb-nailing has also highlighted some weaknesses in the story that need a bit more attention. 

Here are some pencil sketches exploring different poses and angles for my thumbnailing. 

Figure 1: Scanned Pencil Roughs

They are just rough, quick sketches, but useful for me- especially since this will be my first film with animals as the main characters.  Getting human expression while maintaining animals as animals will be one of the design challenges of this project.

Sunday, 31 August 2014

Essimer Buildings

Over the past few weeks I have been working on modelled huts to composite into the world of Essimer. These images show my progress so far.  I ran into a few issues unwrapping even the most basic of shapes, with the UV's twisting in the weirdest of ways for no apparent reason, so things took longer than they should have to get to this point.  I created a template hut to build onto, to ensure the the module pieces would fit together.


The basic template hut I created.

I then started building geometry to fit, starting with assorted walls.  These still need to be unwrapped and textured.
 

I also modelled and textured rafter pieces.  These were mostly textured in mudbox, and fit together as shown below.  I think they have actually come together quite nicely.


RealFlow

In class we have been learning to use Realflow.  These are some of the simulations and experiments I have done so far.

As an introduction we created a basic ocean, added waves, and then dropped a ball into it to create splashes.  This simulation needs a bit of work, as the water sticks to the ball too much and the splash is really intense.


We also learnt how to emit from a shape.  In the simulation below I emitted from a circle and turned on the option to have it emit outwards from the edges.


A lot of adverts use a water simulation using two emitter to collide fluids together.  This is a quick attempt at replicating this.


I also have experimented with colliding fluids against an object.  This technique could be useful for any blood effects in Bones of Essimer.


Meerkat Anatomy

I've been looking a references of meerkat anatomy to help me with modelling my character.  Most photos of Meerkat's and even of their skeletons show them posed in an upright standing position. However as this isn't the natural position for a meerkat I will be modelling my character down on all fours.

The Meerkat skeleton:
Figure 1: Meerkat Skeleton. C. Dodds n.d. sourced from http://commons.wikimedia.org/wiki/File:Skeleton_of_a_Meerkat.jpg 


Meerkat
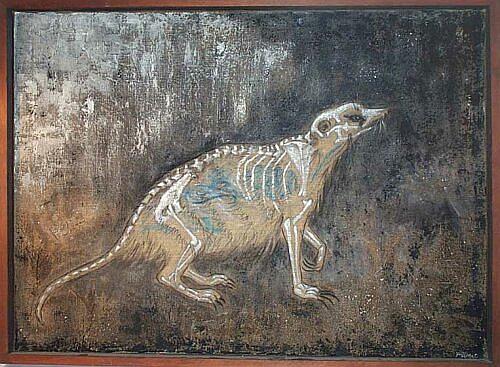
Figure 2: Meerkat. n.d. Acrylic on canvas.  39" x 29".  sourced from http://www.jcpd.net/MTL/meerkat.html


The meerkat seems to naturally have it's back legs gathered beneath itself, the exception being when the meerkat runs, as seen in the photo below.  Otherwise, whether the meerkat is playing, hunting or scouting the back legs appear quite squat.  I need to keep in mind the type of movement that my character will be performing when I model them.