Sunday, 31 August 2014

Essimer Buildings

Over the past few weeks I have been working on modelled huts to composite into the world of Essimer. These images show my progress so far.  I ran into a few issues unwrapping even the most basic of shapes, with the UV's twisting in the weirdest of ways for no apparent reason, so things took longer than they should have to get to this point.  I created a template hut to build onto, to ensure the the module pieces would fit together.


The basic template hut I created.

I then started building geometry to fit, starting with assorted walls.  These still need to be unwrapped and textured.
 

I also modelled and textured rafter pieces.  These were mostly textured in mudbox, and fit together as shown below.  I think they have actually come together quite nicely.


RealFlow

In class we have been learning to use Realflow.  These are some of the simulations and experiments I have done so far.

As an introduction we created a basic ocean, added waves, and then dropped a ball into it to create splashes.  This simulation needs a bit of work, as the water sticks to the ball too much and the splash is really intense.


We also learnt how to emit from a shape.  In the simulation below I emitted from a circle and turned on the option to have it emit outwards from the edges.


A lot of adverts use a water simulation using two emitter to collide fluids together.  This is a quick attempt at replicating this.


I also have experimented with colliding fluids against an object.  This technique could be useful for any blood effects in Bones of Essimer.


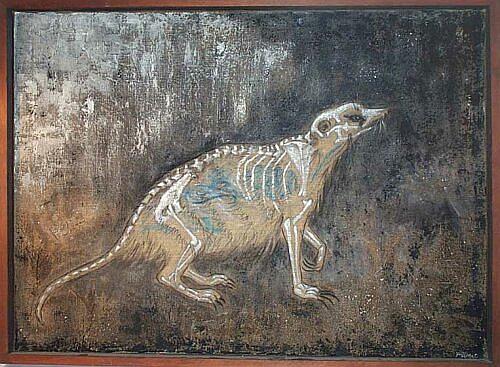
Meerkat Anatomy

I've been looking a references of meerkat anatomy to help me with modelling my character.  Most photos of Meerkat's and even of their skeletons show them posed in an upright standing position. However as this isn't the natural position for a meerkat I will be modelling my character down on all fours.

The Meerkat skeleton:
Figure 1: Meerkat Skeleton. C. Dodds n.d. sourced from http://commons.wikimedia.org/wiki/File:Skeleton_of_a_Meerkat.jpg 


Meerkat
Figure 2: Meerkat. n.d. Acrylic on canvas.  39" x 29".  sourced from http://www.jcpd.net/MTL/meerkat.html


The meerkat seems to naturally have it's back legs gathered beneath itself, the exception being when the meerkat runs, as seen in the photo below.  Otherwise, whether the meerkat is playing, hunting or scouting the back legs appear quite squat.  I need to keep in mind the type of movement that my character will be performing when I model them.


Essimer Update

I've been making some progress on the Bones of Essimer project.  Slow progress but at least there is movement.

My first task was to sort out the Master sheet breakdown for the cinematic.  So far I've completed the first pass of this shot by shot breakdown, working from the rough cut edit.  Once we get the one minute sizzle reel I will need to look over this again, and match up the shot data with each breakdown.  My aim is to make all the information as straight forward as possible, as we will have our hands full getting this done.

Over the past few weeks I have also started working on modelling components for the buildings of Essimer.  I was a bit concerned about these as I had been reading up on modular environments and was worried about how the pieces of the buildings would fit together.  Because the walls of the huts slope inward slightly they wouldn't be completely rectangular like they were shown in the designs.  While some warping can be done on the square walls later to make them fit, providing this is done before texturing, I thought it would be better to try and get them right from the start so that we aren't working on detailed components only to distort them in less than beautiful ways.  The Maths to work this out is a bit out of my league at the moment though, so I decided to build a template hut that we could build components onto.  At the moment we are working on components made using both methods so this should give us plenty of variation.    

I also helped out with the packdown out at Lorneville, at the same time I took a camera out to take texture and reference photos of the sets which will be used to help tie in the appearance of the CG with the live action. 


Monday, 25 August 2014

Fire Simulations

A while back I finished my assignment for fire simulations.  For this assignment I experimented with the Maya plug-in of FumeFX to create a variety of different effects.

This reel shows the different test and experiments that I completed for this assignment.  I enjoyed experimenting with the different effects that could be created using Fumefx.  My favourites were the smoke hits, turbulent flame, and the particle explosions.


In my final render I composited 6 layers together. 3 FumeFx renders (4 nodes were used), a solid shatter on the glass of the windows, the render of the house from Maya and a background rendered from Vue.  Initially I had some trouble as I didn't know how to render the FumeFx elements so that they would be compositable with the house, but after some research I learnt how to create a hold out mask by changing the settings of the material on the house for these renders.   

I attempted to render a shadow pass to composite the house and background better but it didn't work out.

This is the final render.


Tuesday, 5 August 2014

Essimer Title Sequence

We have been talking recently about the Title Sequence for Bones of Essimer, and one of the things we came up with is using 3D text in the title.

Since I'm not 100% today I wanted to stay home and work on things that didn't require heaps of brainpower.

So I decided to experiment with 3D text.  I knew that there was a text option within Maya, but I had never used it.

 The text tool creates curves in the shape of each letter.  The text and font can be chosen by clicking onto the options box.

To make the text 3D I selected each curve and used surfaces => Bevel Plus. This is a very quick and easy way to achieve 3D text.  However you can only choose existing fonts, so if you are wanting something that has been specifically designed for a project you need to either use the vertices to manipulate the text or use a different technique.

I found this tutorial which uses photoshop to create 3D text in Maya.  This seems very versatile as you can convert any drawing into a shape and import into Maya.

I gave this process a try just using the text tool in photoshop.


It looks like it could now be textured.  I had thought that one option for us was to create this text then bring it to Mudbox for more sculpting.  However the front of each letter in both examples is only one face, so this idea won't work as Mudbox needs more geometry and only works with quads.  If the text is unwrapped in Maya though it could be textured through photoshop files.


Monday, 4 August 2014

Looking at Birds: Wings, Feathers and Modelling

Before I get stuck into modelling I wanted to have a look at the different ways other people have approached 3D birds in their animations.

The main things I have been thinking about for my Eagle are the movement of the eagles wings and feathers, as well as how I plan to texture the bird once it is modeled.  Some options I have thought about include using the Maya Hair system textured with feathers to create a dynamic feather system, using geometry and sculpting the feathers on the wings, or testing out a feather script which I have found a few of online.  

I haven't locked off my storyboards yet, so the movement that my Eagle needs to have could still vary.

This tutorial is quite old but uses nurb planes for the feathers with feather textures and transparency maps applied.  The tutorial suggests that various models might be needed for different actions rather than a single master model.  This looks like a really useful tutorial as it shows the rigging used and sets up the fanning feathers as a set driven key.  Most of the discussions I've seen online about bird feathers and wings mention this tutorial.

This is the example wing flap from the site:   
Jackal. (2001). Sourced from http://www.jackals-forge.com/tutor/tut1.html


This is another old tutorial for a cartoony bird.  The feathers of the body are extruded directly from polygon edges.  However this tutorial contains triangulated polygons, which I will not be using. 

This tutorial suggests feathers using displacement maps together with individually modeled larger feathers on the wing that would be created using Maya nhair.  It gives this example  in which the pink feathers would be a solid mesh with a displacement map and the blue would be individually modeled.

(Model by David Krentz)

 
The tutorial goes on to explain how to convert a nhair system into PFX geometry planes with can then be textured and opacity mapped.  It suggests shading with an anisotropic material with painted direction maps but I don't know what that is.

This Youtube video shows a Wing Creator script that is free from Creative Crash.  


 While researching I also came across this test which I thought was really quite beautiful.